How to install dimpled lining membrane to difficult to drill stone or cob walls without using fixing plugs
Damp or salty stone, cob, random rubble or other undrillable walls can be successfully lined using our dimpled plastic membrane, Kontract Membrane, without the need to use the normal plastic fixing plugs by using a simple, wooden 'stud' frame instead.
The Membrane provides a true Vapour Barrier, so ordinary low cost Rockwool or glassfibre insulation can be fitted within the frame. The Membrane prevents the dampness from ever reaching the timber frame or the insulation.
The frame can then be covered in ordinary low cost plasterboard or any other board material suitable for the environment and final finish (e.g. Plywood for a Garage).
Benefits
Summary of advantages of the plug free method
1. Considerable cost savings - minimal wall preparation, lowest cost membrane (Kontract), lowest cost insulation and lowest cost board. Lower labour costs than other methods.
2. Fast fix - no wet rendering or tanking, so no drying out period, just plaster skim finish if required.
3. No risk of failure - you can see the Membrane before insulation is added, and easily check that it is perfect - that's why we offer a 20 Year Guarantee
4. Free telephone and E Mail help from our experienced team
5. Membrane by the metre - unlike other suppliers we provide membrane off the roll - no expensive waste or storage problem.
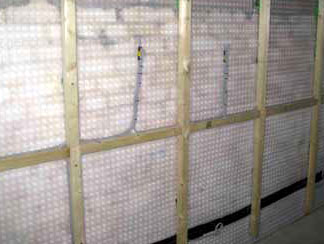
Step by step lining method - summaryKontract dimpled air gap membranes are a modern, vapour proof barrier lining - they are made of strong dimpled plastic sheet which is held, dimpled side to the wall, to form a vented air gap, by a timber frame. The lightweight timber frame is only used to carry the final board and is not structural, so the wood can be small in section - the chosen thickness must match the chosen insulation thickness.
Air Gap Membranes - how to install without using plugs
1. Remove all gypsum plaster (solid sand and cement render can stay), wooden plugs and bonding timbers. This is a precaution to eliminate the risk of decayed plaster, wood or paper falling down behind the membrane and blocking the air gap. Brush and vac the wall.
2. Check whether you have any 'active' water weeping from the wall, or if the area has ever suffered from flooding. If there has been any activity you will need to install a drainage method - either a traditional drain or a sump and pump. (Call us for help on 01626 872886 ).
3. Choose your insulation thickness - this will determine the minimum thickness of your frame timbers - 50mm insulation requires a 50mm thick timber.
4. Order our Kontract Membrane - add 10% to your area to cover to allow for overlapping joints
5. Hang the Kontract Membrane from the ceiling, using temporary part-nailed thin strips of wood (battens) to secure them to the ceiling, close to the wall, rather like curtains, dimpled side to the wall.
6. The floor may also need to be covered with Kontract Membrane - a 'floating' (not screwed, nail or glued down) tongued and grooved chipboard or concrete screeded floor (3 inch/75mm thick) can then be laid. Where liquid water is involved this floor Membrane has to be joined to the wall Membrane - this is called the 'sealed system' and must incorporate a drain or a sump and pump. Floor insulation can also be inserted.
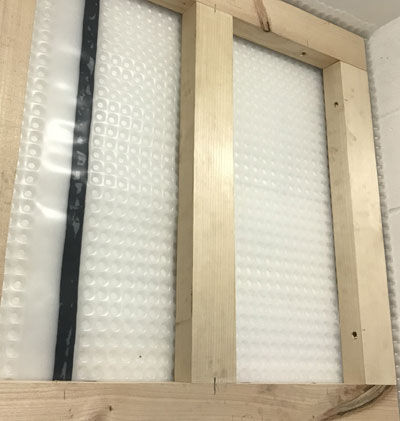
7. Once the Kontract Membrane has been fitted and taped at the joints the wooden frame can be installed.
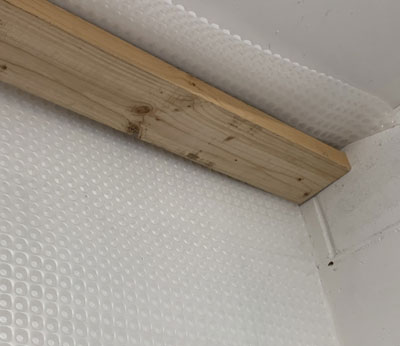
8. Use Frame Fixings or screws to secure the frame to the walls and ceiling joists. At the base inject Silicone into the fixing holes before inserting the Frame Fixings to eliminate the risk of moisture passing upwards into the frame.
Step by step lining method - detail
Order our Kontract Membrane - add 10% to your area to cover to allow for overlapping joints

Hang the Kontract Membrane from the ceiling, using temporary part-nailed thin strips of wood (battens) to secure them to the ceiling, close to the wall, rather like curtains, dimpled side to the wall.
Make sure that Membrane will extend beyond the edges of the
wooden frame, as shown befow.
Once the Kontract Membrane has been fitted and taped at the joints the wooden frame can be installed.
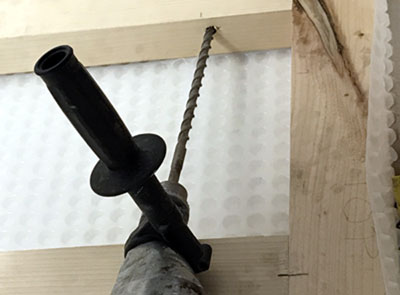
Note - pre drill the frame edge members before installing
Now drill through the existing holes with a Masonry Bit to suit the Frame Fixing diameter.
Use Frame Fixings or screws to secure the frame to the walls and ceiling joists. At the base inject Silicone into the fixing holes before inserting the Frame Fixings to eliminate the risk of moisture passing upwards into the frame.

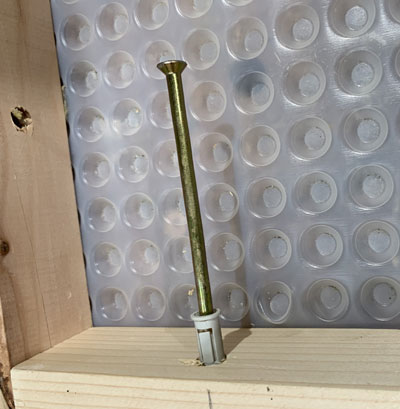
Gently insert the Frame Fixings
Note - Membrane extends beyond the frame slightly
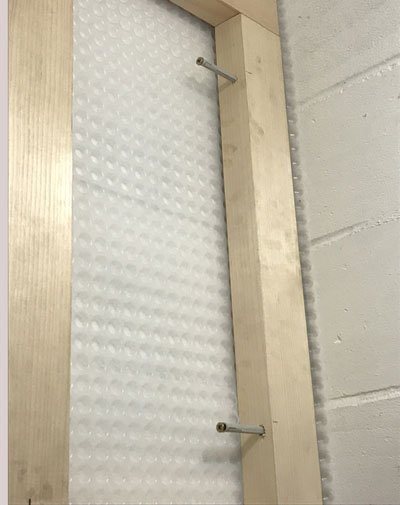
Drive the Frame Fixing gently in until the plastic neck seats against the wood,
then tighten the screw with an electric screwdriver.
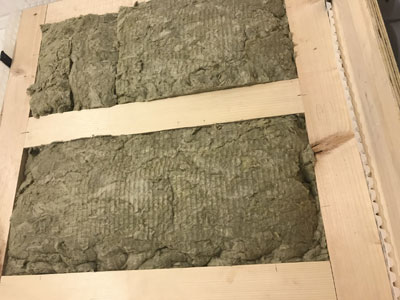
Now you can fit the Insulation, ready for boarding
Fix the plasterboard, plywood or other boarding to the frames.
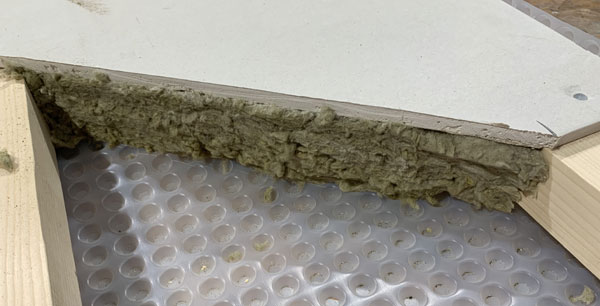
Cut away photo showing plasterboard over Rockwool Insulation
Kontract Membrane lining - materials required
Kontract Membrane - supplied on rolls, 2 metres wide - order by the metre or whole rolls 20 metres long
Double sided Tape - supplied on rolls, 28mm wide x 22.5mm long - allow 2 rolls per full roll of Kontract Membrane
Mastic Rope - supplied on rolls, 10mm diameter x 5 metres long - useful if pipes, wires or electrical boxes penetrate the membrane
Frame Fixings - to suit frame wood thickness
Plasterboard - 12.5mm thick x 1.2m x 2.4m per board
Rockwool Insulation - supplied in a pack containing 6 x slabs 455mm x 1000mm
Wood and nails - to make the timber frame - from 2 inches x 3 inches (50mm x 75mm) upwards to suit your chosen insulation thickness
Kontract Membrane lining - tools required
Saw to cut the framing wood and the battens
Saw to cut the plasterboard
Hammer for nailing the frame and tapping in the Frame Fixings
Screwdriver for driving the Frame Fixing Screws
Electric Drilling Machine for drilling the wood and walls to fit the Frame Fixings
Wood Bit to suit the Frame Fixings
Masonry Bit to suit the Frame Fixings
If you need any help with lining damp walls or 'tanking' products, Property Repair Systems staff will be pleased to give you completely free, no obligation advice on 01626 872886 .
Membrane | Privacy Policy | Returns Policy | Contact
Property Repair Systems
T: 01626 872886
Use any of our Shopping Pages to place goods in your Shopping Cart - they all use the same Shopping Cart system.

Click to view your Shopping Cart
or continue shopping by clicking on our Membrane Shop link below.
Other Property Repair Systems Sites:
www.epoxy-info.co.uk - epoxy resins for repairing wood, concrete, brick and stone
www.fire-door-paint.co.uk - upgrade doors to 30 minutes fire resistance
www.joist-repair.co.uk - how to quickly repair joists and beams of any size
www.propertyrepairsystems.co.uk - our Home Site
www.steel-fire-paint.co.uk - treat steel with Intumescent Paint to provide fire protection
www.timber.org.uk - systems of repair, with step by step methods
www.timber-repair.co.uk - how to repair timber beams
Site written by: David Moore
David Moore, B.A. (Hons.), C.T.I.S., C.R.D.S. Technical Author
Google+